
Be as specific as possible when reporting issues and *ALWAYS* include the full version number of the application you are using and your exact *CAMERA MODEL*
NEVER POST YOUR KEY IN ANY PUBLIC FORUM, INCLUDING THE O'TELESCOPE SUPPORT FORUM ::: IF YOU DO YOUR KEY WILL BE DEACTIVATED WITHOUT NOTICE!
- 0


Question
SteveRosenow
I feel since there have been several orders for this cable trickling in, and since my printer died before I could print off the instructions I had formatted out for each order, I figured I would post them here.
INSTRUCTIONS
1.) Upon the receipt of the MC-DC2_USB2.0 cable, you will first need to plug the USB end of the cable into your computer. This is to allow for Windows to find and locate the drivers needed if they aren't previously loaded in your particular install of Windows (NOTE: These were tested on a system which is powered by Windows 7 Ultimate 64bit, Service Pack 1). This process uses the "Found new Hardware" wizard that automatically pops up, and it downloads the drivers directly through Microsoft Windows Update if needed. This process takes anywhere between 30 seconds to five minutes depending on your internet speed.
2.) After your cable is fully recognized by Windows, insert it into the MC-DC2's cable port on the left side of the camera body. Then insert the second OEM USB cable into the camera. Following that, connect the USB ends of both cables to your computer's available USB ports.
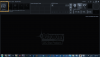
3.) Load BackyardNIKON. Once BackyardNIKON has loaded and all Nikon drivers have initialized, turn on the camera, then wait ten seconds. After ten seconds, click the "Connect" camera icon at the upper left corner of the BackyardNIKON application window (See Fig. 1 below).
Once BackyardNIKON has loaded and your camera is connected, locate the Capture Plan center on the right hand side of the window. The MC-DC2_USB2.0 cable utilizes a TTL-Serial output line. Select the drop down menu labeled "Cable support" in the Capture Plan center in Fig. 2 (below).
Once the menu expands, you will see the following in Fig. 3:
4.) The next step involves trial-and-error. As each TTL-Serial USB plug has a different chipset, in addition to each USB port having its own designator, you will need to go through a process of elimination. Starting with Serial COM1, return to the Capture Plan center and initiate a 10 SECOND BULB exposure in the exposure control settings. This will determine the settings you will need to use.
If the first BULB exposure immediately aborts, move down the list. Those that abort immediately are Serial Com ports that do not exist or will not work with the cable.
A successful test is denoted by the camera shutter activating and the countdown timer initializing in the right hand portion of the window, after a few seconds a test image will show up.
Link to comment
Share on other sites
Top Posters For This Question
3
2
2
2
Popular Days
Nov 5
3
Mar 26
3
Jul 23
2
Jan 2
2
Top Posters For This Question
admin 3 posts
innkeeper 2 posts
redstamp 2 posts
Tslisher 2 posts
Popular Days
Nov 5 2014
3 posts
Mar 26 2015
3 posts
Jul 23 2017
2 posts
Jan 2 2015
2 posts
Popular Posts
simoninthelakes
Here's my version of the USB-serial adapter cable for my Nikon D90. It was always my intention to butcher the MC-DC2 remote, as all I needed was the cable with the Nikon plug on the end, and the
Posted Images
22 answers to this question
Recommended Posts
Join the conversation
You can post now and register later. If you have an account, sign in now to post with your account.
Note: Your post will require moderator approval before it will be visible.